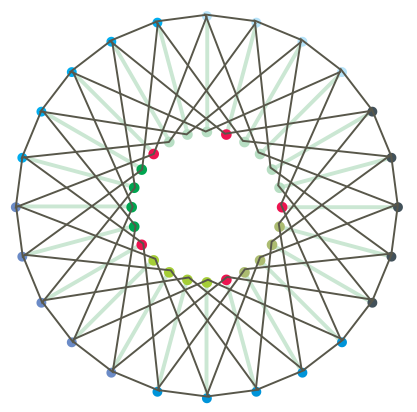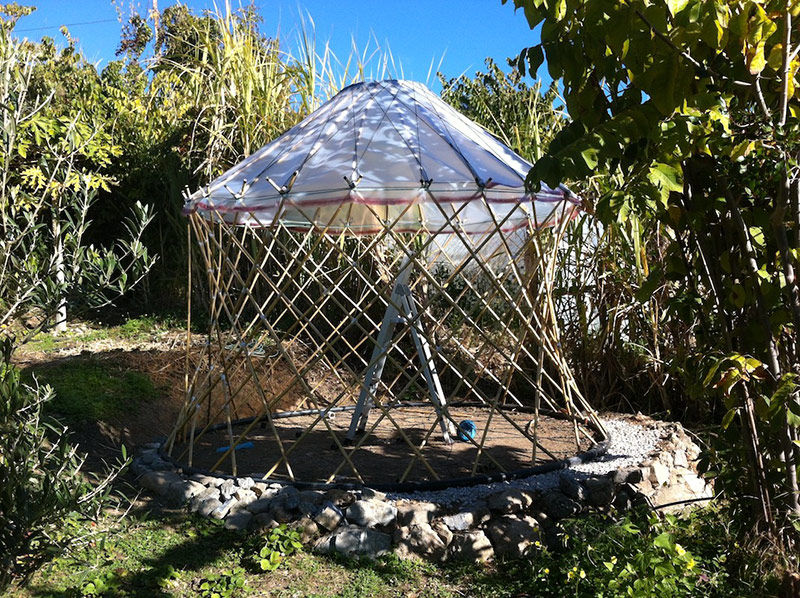
It is tricky to get circle equally marked for cutting holes, but simple way could be applied:
- buy pipe by foot longer* than needed
- put pipe connector for single end only (do not yet connect)
- mark the first hole closest to the pipe’s connector (I have it done wrongly, so the last hole came in the middle of connector)
- keep marking the next hole by same step/length (calculate it yourself and keep reasonably round measure, not to be bothered for micro-meters)
- once the last (48th) hole is marked, you should connect the loose end by taking last and first hole for the same distance – so you will need to *- cut/shorten the remaining bit of pipe

These are holes of 20mm. Those were cut with a circle-cutter, available in the hardware shop. Might take some time to figure out the best way of cutting it through the melting the polypropylene. Easier to keep cutting it angled. Holes are cut in to pipe straight downwards (90deg)

Set up comfortably, use gentle saw for cutting.

On picture above, the caña is bent too much and is no good.
Select cañas most straight possible and similar in thickness. Slightly bent cañas are fine.
Below, fairly good and still should be used. Always take the most straight part from a long caña keeping similar thickness.

At some point, while assembling khana, curved cañas come to good use.

Cut bottom part by the joint only. Polish sharp edges to avoid splits.

Measure and cut the same length of cañas for khana and roof poles. Keep thicker cañas for the roof-poles.
It is important to secure the top-cuts with tape to prevent the splitting.

Below is example of difference in pipe thickness. The blue marking – thickest available, green – medium, etc.. Thickest is most robust and won’t fold if bent, but also for some parts is to hard to work with. For instance, for making clippers is better to use green mark, as blue simply too thick to apply.

To redistribute holes equally for a circle, an easy option / idea is to put marks on the tape, before applying it onto pipe. Precise diameter of crown is not so important, rather redistributing marks by the whole number, say every 80mm sharp, is much easier than every 77mm..

I’ve used another thick pipe of 20mm which nicely fits in to 25mm to join those. Use heat to loosen pipe tension.

A little hole in the middle of connector helps to push air away while joining the ends. Tape with markings applied onto pipe suggests precise position for hole to be cut.

Before cutting a hole at once, drill 6-8mm holes (in center of every further hole) and then start drill the holes.

Sorry for a hairy leg, I meant to show the screws which are keeping inner pipe firmly set. Cut holes in 45 deg towardsw center.

Having a flat spot for the yurt is very important. Once earth moved, compass-draw/mark the circle, so your base sits perfectly round. I’ve used 8 poles to hammer inside the circle to keep it still.

To get the pipe laying flat, take a look from same height (if possible), and adjust it most to be flat, like on pic below.

Now, let the magic of math take you for a spinning dance, so keep your head clear and start counting.
- Take first pair of laths and put them in to (any) 1st and 18th holes. So in between there should remain 16 holes. Stick to this magic number.
- Next pair put in to 17th and 34th holes. Another 16 in between the formed triangle, with one previous lath taking space.
- Fix tops temporarily, as later those might need adjustment.
- Keep adding rest pairs in the same manner, until 12 laths used (6 pairs) will form the crown type shape. Such hexagon makes an equal (symmetric) assemble.

Refer mindfully to instructions below, as this is not the best way of khana assemble for getting equal height.
As you see on pictures above and below, I have taken an equal measurement of the height between joints, fixing them in to exact position by fixing joint (I’ve used narrowed duct-tape) and fixing height by putting laths on string tension.
Top fixed laths does not fall, but taking the tension (upwards) when bent for appropriate height.

The best and proper geometry of such assemble is when the top-joint is vertical to the base. For this I’ve used simple and ancient way – string with pendulum. DIY.

All six corners I’ve fixed on a string, each in the proper position and same height. Joints fixed with narrow duct-tape.

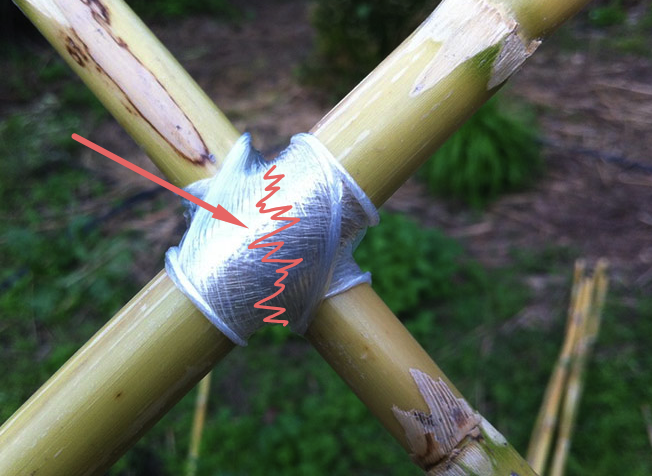
Dozen of life-hack suggestions for using an industrial wrapping film, and here is another one. (Not the kitchen cling wrap, as those are to thin, but more industrial one, bought in any hardware store).
Slice the film in to size of 6-8 cm tape (2-3 inch). A saw (could be saw for iron) might cut it through well – can not say for sure, try it yourself. I’ve used sharp thin knife to slice it.

Industrial cling wrap. Strong, sticking but non sticky, stretchable tape without annoying sticky and leaking glue. Easy to apply, easy to use, easy to cut&remove.
While assembling the second row of six pairs (do not miss the count!), separated joints should come together.
At this point, tension of non-straight laths cripples the exact height of upper joints. I might suggest not joining the laths, until the whole khana is assembled.


And so on and further keep adding pairs of laths. Mind the space – remember 16.


Hello uncle! Where is the door?!
Not the regular door with a doorknob, here. There will be two options to choose the entrance window. As seen below – stepping over the crossed part, which is more comfortable as the entrance “hole” is higher.

Once almost all khana (except entrance) assembled, the remaining laths should be added. These will difference in size. Cut the top part (the joining side) by the cañas joint and the bottom part (goes in to the pipe) by length needed.
Cut-curve the joint, so it will sit nicely on supporting lath.


For atesthetics, you might spare a little time for folding the margins of wrap-film, so while wrapping it, keep margins not too tight.

The same idea will help further to fix the roof-poles.

Assembled khana’s tops, using technique of measuring each joint’s height from the base (as described above), might not bring the best results. While joining already settled laths, the tension cripples the joint’s height.

Weaved the top joints with a thicker rope for two reasons – obvious, to keep it fixed and further in to this rope the wall-cover (plastic sheet) will be clipped.

Referring to upper’s rope positioning, it is seen unequal in height. However, if laths and top joints not yet assembled, I believe, this might help to settle khana’s tops precisely. This part of assembly should be rethought. So far, I think joining the lower parts (crosses) of khana would be good idea, while top parts and top joints could be adjusted at the end.

There will be 24 roof-poles, so 24 holes in a crown. Mark any first hole, count 7 holes, mark 8th. Repeat the same, so 8th, 16th and 24th (or 1st) holes are marked.
Find 6 thicker poles which will sit tightly in the crown’s holes. Erect the crown on 3 (not 4!) poles sticking in to the marked holes. Add another 3 poles in the middle and adjust the equal spacing between khana-joints.

Once all poles are set, adjust the position of the crown (twist and/or bent), so it is parallel to the base and not twisted. Further, when roof will be covered, the wobble of the crown will be fixed.

Roof poles of 140cm require circular cuts with reasonable margins, which is 140×2+margins = 280cm+margins, so cut the circle of 320cm diameter. Then cut-off the center hole (smaller in size than the crown), leaving margins of 15-20cm.
I’ve used two sheets of plastic, one overlays another with approx 40cm margin. Using a string-compass, spray/draw the outer circle on such square, cut it out and cut the inner (crown) hole.
I’m lacking pictures in between, but I do remember that windy day which didn’t help at all. Some details I will describe in words.

Another life-hack tip – self made pipe-clippers. Choose medium thickness pipe (in my case, used for crown), cut in to dozen of pieces of 5-6cm and cut-off the split of at least 0.5cm. Cut-off the top edges, as those will poke the plastic as well as cut a sharp-inner edge of split-opening. So idea is to get the least possible sharp edges. Refer to pic below.

Use those clips assembling the roof-cover, clipping the plastic folds in to crown-pipe. Once assembled properly, cut the folds and unnecessary pieces of plastic.

The bottom part overlap is also, simply cut, to fit around the upper joints. It also makes nice fold. At first it might not look convincing, but once weaved around with string, it will stay firmly locked.

Now, weaving is another very tricky calculation. I believe there is more than one efficient way of it, but save you time and refer to diagrams below.
Even following strict pattern of weaving, I’ve failed at the end of it. No big deal, but some imperfection though..

Further, simply repeat a weaving pattern, but what is not simple, is too keep proper step count.


This type of weaving, hooking the triangles at the bottom, will make a circle-weave around, which is additional support.


I was to slow with idea to wrap it all around with the packing wrap-film and have used green-house’s plastic. It could be wrapped all around starting from bottom to the top, applying many layers of the film. The bottom might be a bit tricky but not impossible and the rest is simply a cross-cut to form the door opening. In fact, comparing to the price of plastic v.s. film – film is cheaper. I believe it might also look more sleek and will not require additional weaving for plastic sheet, which are described all below. ATTN!! (DO NOT DO IT, READ EDIT1!)
In this case, 2 pieces of 2x2m sheets are used for cover. In separate pieces, for two reasons – first, I had not the whole entire length of it, so had to use other bits I’ve got (fairly big), next – assembling the sheets in pieces is much easier work. Takes bit more plastic, but lesser nerve.
Another magic of little paper clips – quick, simple, efficient, reusable..

Yurt’s wall geometry has a beautiful waist, so the hanging sheets should be tied around. I’ve simply tied one circle around the center, one upper and one lower part of the wall. Both, upper and lower strings will be sliding towards the center, so those will need to be weaved through and around.

No instructions or suggestions on further weaving, as this part is simple and could be weaved in different ways. Idea is to hook the sliding circle-string.


Once weaved all around, the structure gets tightened and takes the very final shape.


To cover/uncover the top, I do not have any better than most the simple idea – umbrella (fixed obunjee).

The door seams were the very last bit to be made. While trying to generate something genius, I’ve simply came up with covering the entrance with another square sheet. Served the purpose.
ATTN! Do not forget to seal/close the top-parts of joints, in order to keep it away from collecting rainwater.
Read EDIT1;

Bungee hooks to keep the door tightly closed. Easy to use, flexible, simple.

The circle-shape suggests the inside design of placing beds for the plants. Keep reasonable space in the middle for say, seeding pots, buckets, and a small garden stool. The key is to shape it like a keyhole.


You should be rewarded with leafy veggie seedlings in three weeks.. Do not forget the horse manure – most gentle, yet very powerful fertilizer which gives magic.


Final notes / edits / updates / observations.
Is it durable?
Further, I will be adding more photos and pointing the weakest points, so keep an eye on this article.
The first, strong point of such a structure – total stiffness. It has no wobbly, falling or detaching parts. Two men (three would be best) can take this yurt by the base and lift it with ease (approx 40kg). One man can simply pull up the base and tilt-open it. Although is not very heavy, it still sustains very strong winds (this yurt sits on the Mediterranean shore, where winds are the biggest natural force).
Surprisingly not much moisture (if at all) is collected below the roof-plastic. Presuming it is more airy and ventilated through little gaps between roof and wall, which keeps lesser vapor. The first thick condensation has collected only 2 weeks after I’ve planted veggies.

Condensation does not evaporate quickly, but I believe, if top and entrance are kept open for a day, this should get dry if needed. No condensation is collecting on the walls. I will take on account to check for how long roof-poles will serve in such conditions. Respecting properties of distilled water, this should last way longer, comparing to rain water, for instance.

So far the only week point (unfinished work..) – plastic wrapped roof-pole’s ends**. After the rain it took in some water which was not escaping. Mind on checking these parts and upgrading it for a better fix. Perforating such a wrap all around – should help.

EDIT1: after 3 years
Greenhouse is still in place in same shape, nothing broke and is not getting any moisture inside, as top part (crown) is usually kept opened. **Closing cane’s open-ends (so no water collects in it) was never done. It is not raining so much in Spain, and cane does not rot (decompose) so fast. From the first built stage, after 3 years there were not any single adjustments or repairs.
The only change — thin plastic wrap, used to keep joints together, started to crack. This is due to long UV exposure, which hardeners polyethylene. This does not effect the structure at all, as all body already is set in to the shape and most of this plastic cling wraps can be removed.

Last updated: 2021-12-12